TrackMate User Guide
Welcome to the TrackMate User Guide
Welcome to the TrackMate User Guide - your essential supplementary tools in your teaching journey as a School of Computing (SoC) Teaching Assistant at National University of Singapore (NUS).
In this comprehensive user guide, we will take you to experience a full journey with TrackMate step by step.
Table of Contents
- 4.1 Student Data Related Commands
- 4.2 Tutorial Data Related Commands
- 4.3 Assignment Data Related Commands
- 4.4 Attendance Data Related Commands
- 4.5 General Commands
- 4.6 Saving the Data
- 4.7 Editing the Data File
1. Introduction
1.1 What is TrackMate
TrackMate is a desktop application specifically designed for teaching assistants (TAs) who work at the School of Computing (SoC) of National University of Singapore (NUS). By providing an efficient solution to manage student data, TrackMate simplifies the process of tracking assignments, tutorials, and attendance. With its powerful Command Line Interface (CLI), TrackMate allows TAs to efficiently manage student information while enhancing productivity in their administrative tasks.
Overview of Main Features:
- Tutorial Management: Track student tutorial groups for each session.
- Attendance Monitoring: Record attendance effortlessly to ensure that student participation is logged accurately.
- Assignment Tracking: Easily add, update, and manage assignment submissions and statuses for students.
1.2 User Proficiency and Expectations
Level of Relatedness: Users of TrackMate are TAs within SoC who are actively involved in managing students’ academic progress, particularly in tutorials, assignments, and attendance tracking.
Comprehension: Users are expected to have a working knowledge of academic processes such as student grading, tutorial scheduling, and attendance monitoring within the context of NUS.
Prior Knowledge: TrackMate assumes users have basic computer proficiency, particularly in navigating CLI environments, and are comfortable managing data related to student performance.
Desire for Efficiency: Users of TrackMate prioritize streamlined workflows, allowing them to manage student data effectively while reducing the time spent on repetitive tasks.
1.3 Why This Guide Matters
This guide is crafted to ensure that you make the most of TrackMate's functionality. Whether you are just starting out or are an experienced TA, the guide will walk you through using the tool efficiently, offering shortcuts and tips to enhance your experience. By following the steps outlined here, you'll be able to simplify your workflow, allowing you to focus more on teaching and less on administrative tasks.
We’re here to help you make the most out of your TA experience with TrackMate. Let’s dive in and explore how TrackMate can transform the way you manage student data at SoC!
2. How to use this User Guide
This section is designed to help users effectively navigate the User Guide for TrackMate. Below, you'll find information on how to interpret icons, formatting, and instructions provided throughout the document.
2.1 Navigating the Document:
Table of Contents: Located at the beginning of the document, the Table of Contents provides an overview of the topics covered. Users can click on any section title to jump directly to that part of the guide.
Section Organization: Each section is organized with headings and subheadings, breaking down information into manageable chunks. Users can easily locate specific topics or commands by scanning through the contents.
2.2 Sections:
Written below is a detailed overview of the main sections in this User Guide and what you can expect from each section.
Installation: New to TrackMate? Visit this section for a straightforward, step-by-step guide on installing the application.
Commands: Dive into the details of TrackMate's commands, with thorough explanations and practical examples to help you master command usage.
Command Summary: Designed for experienced users, this section provides a quick-reference list of all supported commands.
FAQ: If you have questions or encounter issues, this section covers frequently asked questions to help you resolve common concerns.
3. Getting Started
3.1 Installation
Ensure that you have Java
17installed on your computer. TrackMate works the best with Java17while there may be other versions that it can function on as well.Download the latest
TrackMate.jarfile from the link here.Move the file to the directory that you have as the home folder that you want to keep your
TrackMate.jarfile in.Go to your command terminal by following the instructions below, depending on the OS that you use.
Navigate to the directory that holds the
TrackMate.jarapplication by using the cd command.After navigating to the directory, enter the
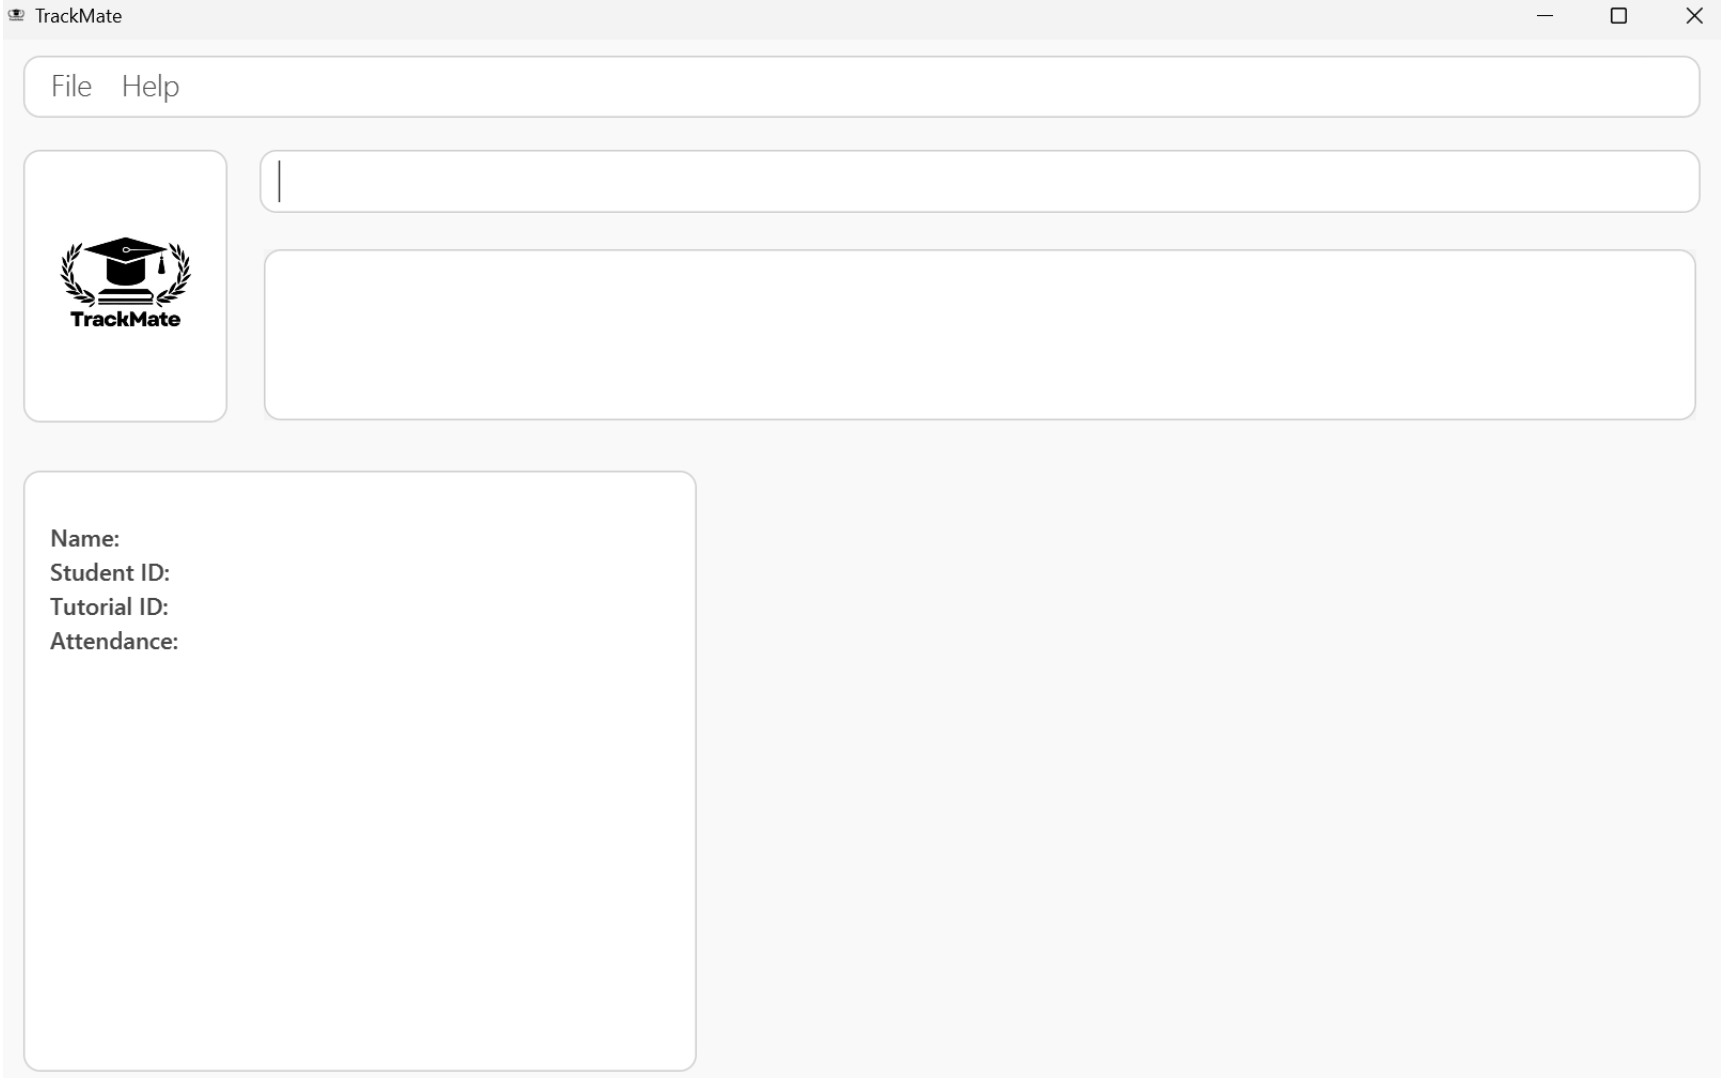
java -jar TrackMate.jarcommand to run the application.Wait for a few seconds and a GUI should pop up, similar to the one shown below.
- Type the command in the command box and press Enter to execute it. e.g. typing
helpand pressing Enter will open the help window.
Some example commands you can try:
addTut tn/CS2103T W01 c/T1001: Adds a tutorial of nameCS2103T W01and tutorial idT1001.addStu n/Samson s/A1234567X c/T1001: Adds a student to the application and assigns him to tutorial with tutorial idT1001.markAtt s/A1234567X c/T1001 d/2024-01-24: Marks the attendance of the student with idA1234567Xfor the tutorial class with idT1001on the date2024-01-24.list: Lists all student details.clear: Clears all data from TrackMate.exit: Exits the app.
- Refer to the Command Section below for details of all commands supported by TrackMate. Alternatively, refer to the Command Summary for a quick summary.
3.2 Graphical User Interface Layout:
3.2.1 User Interface Overview:
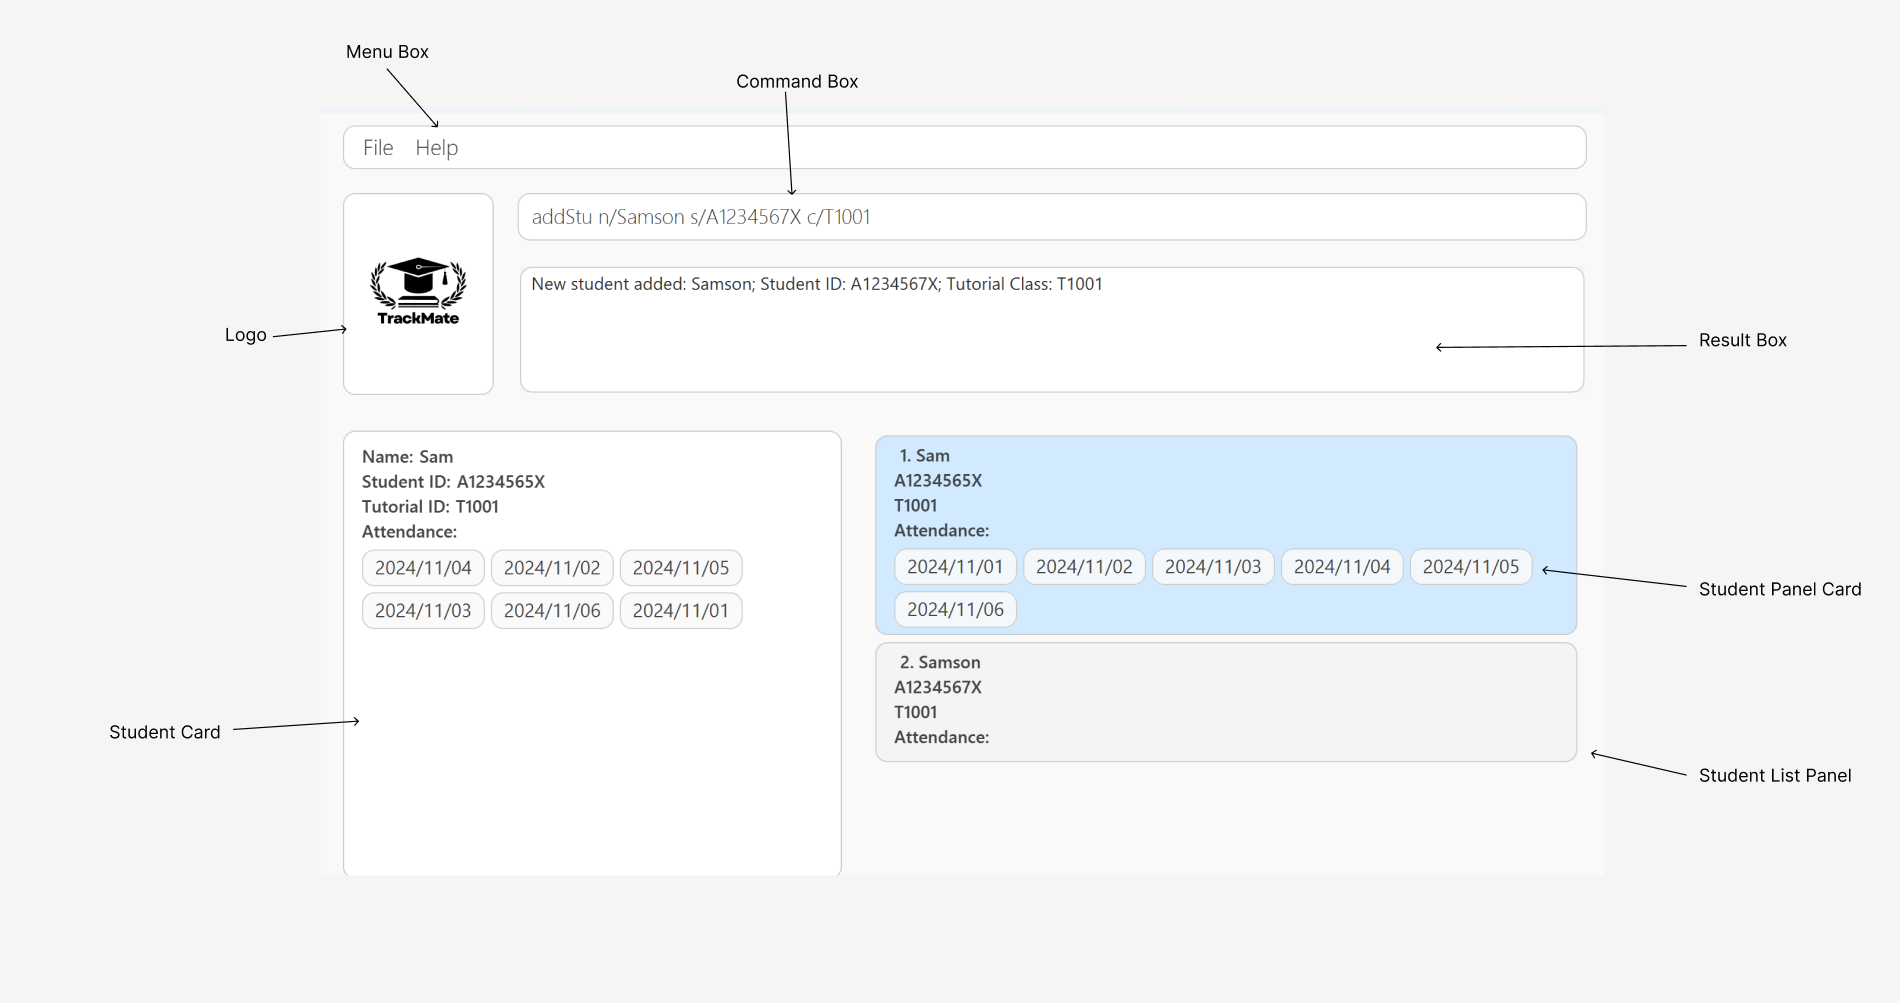
The designated names for each component of the User Interface will be used consistently throughout the User Guide to ensure clarity and minimize confusion. Below is a detailed description of each component.
Menu Box: The menu bar, located at the top of the interface, provides access to various functions and features within TrackMate.
Logo: This represents the logo of our application, TrackMate.
Command Box: This section allows users to enter commands for TrackMate to execute.
Result Box: The box shows the results of executed commands at the interface.
Student List Panel: This panel visually represents the roster of students stored within TrackMate.
Student Panel Card: Within the Student List Panel, each student is depicted with their details displayed in card format.
Student Card: Users can view detailed information about a student by referring to the Student Card, which displays comprehensive information stored in the system.
3.2.2 Additional UI Components:
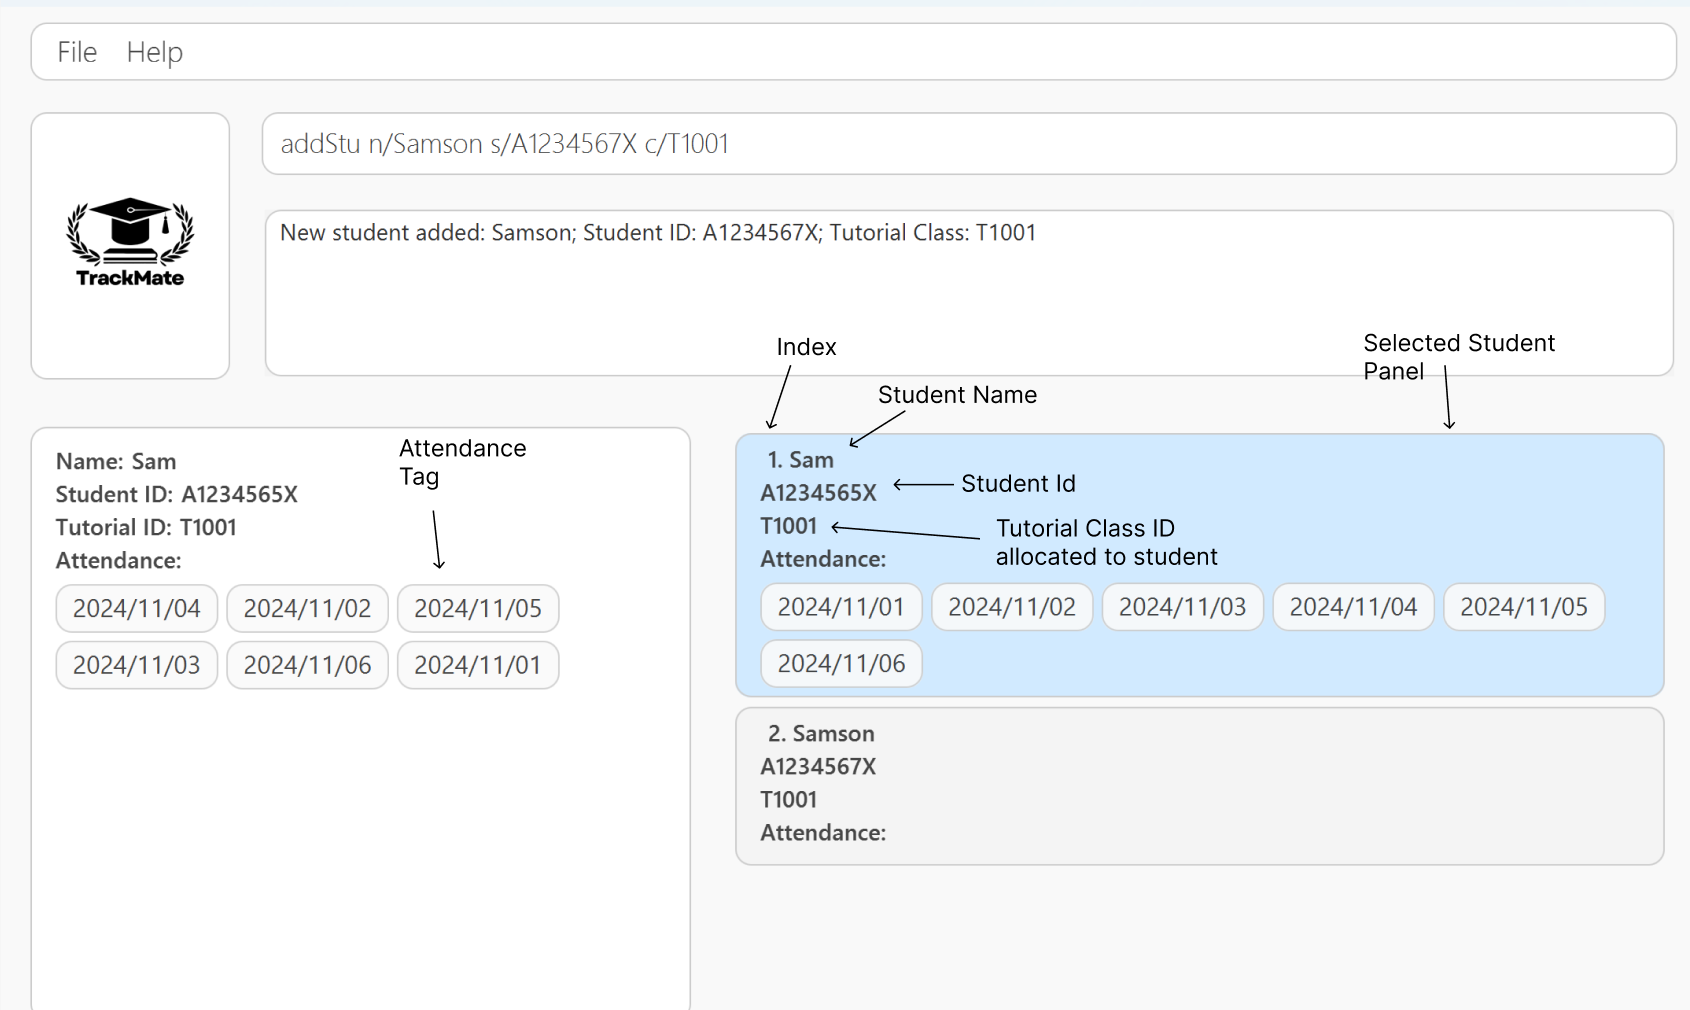
Index: This component displays the position of each student in the Student List Panel.
Student Name: The Student Name is displayed in both the Student Card and the Student Panel Card, representing the student’s name.
Student ID: Every student will be assigned to a student ID before being added to a system. Take note that the student ID is unique and is an easy way to identify a student.
Tutorial Class allocated to student: This component appears just below the student ID. The component displays the tutorial class that the student is allocated to.
- Tutorial class are presented in the form of TXXXX, where "T" refers to a constant letter signifying that it is a tutorial and "X" refers to any integer between 0 and 9.
- However, if there are no tutorial class added to the student. Then it will display "No Tutorial Assigned" instead.
Attendance Tag: The attendance tag displays all of the dates in which the student has attended the tutorial class.
- The tag uses a datetime format of the form
yyyy/mm/dd.
- The tag uses a datetime format of the form
Selected Student: Highlighted in blue, this component indicates the selected Student Panel Card for viewing in the Student Card.
3.3 How to use TrackMate commands:
TrackMate operates primarily through text-based commands. Before we explore the specific commands in detail in the Commands section, let’s familiarize ourselves with the basic components and format of a command.
Tip: All the command words are case-sensitive!
addStuis different fromaddstu
3.3.1 Parameter Prefixes:
In TrackMate, a parameter prefix acts as a delimiter for specifying different types of parameters in commands. Here's a reference table for common parameter prefixes and their corresponding parameters:
| Parameter Prefix | Corresponding Parameter |
|---|---|
n/ | STUDENT_NAME or ASSIGNMENT_TITLE |
s/ | STUDENT_ID |
tn/ | TUTORIAL_NAME |
c/ | TUTORIAL_ID |
d/ | ASSIGNMENT_DUE_DATE or ATTENDANCE_DATE |
3.3.2 Parameters:
In TrackMate, a parameter represents a placeholder where users input data. Parameters typically follow immediately after their corresponding Parameter Prefixes. Essentially they are to be supplied by the user.
Note: All user inputs including parameters will be trimmed (all leading and trailing whitespaces will be ignored).
| Parameter | Parameter Prefix | Description |
|---|---|---|
STUDENT_NAME | n/ | Specifies the name of a student. Requirements:
|
STUDENT_ID | s/ | Specifies the Student ID of a student. Requirements:
|
TUTORIAL_NAME | tn/ | Specifies the name of a tutorial. Requirements:
|
TUTORIAL_ID | c/ | Specifies the Tutorial ID of a tutorial. Requirements:
|
ASSIGNMENT_TITLE | n/ | Specifies the name of an assignment. Requirements:
|
ASSIGNMENT_DUE_DATE | d/ | Specifies the due date of an assignment. Requirements:
|
ATTENDANCE_DATE | d/ | Specifies the attendance date of a student. Requirements:
|
KEYWORD | Not Applicable | Specifies the keywords to search for when finding students. Requirements:
|
INDEX | Not Applicable | Refers to the index number shown in the Student List Panel. Requirements:
|
3.3.3 Command Format:
To understand how a full command is interpreted, we will utilise the following example.
Example: addStu n/STUDENT_NAME s/STUDENT_ID [c/TUTORIAL_ID]
Tip: You can add a student without specifying a tutorial ID!
Structure of Command:
| Component | Description | |
|---|---|---|
addStu | Command | Executes Add Command to add a student. |
n/ | Parameter Prefix | Unique prefix to distinguish STUDENT_NAME from other prefix. |
STUDENT_NAME | Parameter | Represents placeholder for name of the student. |
General Notes about TrackMate:
A command can be categorized into three formats:
COMMAND+PARAMETER_PREFIX+PARAMETERCOMMAND+PARAMETERCOMMAND
Hint:
Adding a tutorial before enrolling a student would make the process more efficient!
4. Commands
This section provides comprehensive guidance on how to use each command, detailing their functionalities and usage scenarios. For specific constraints related to each parameter, please refer to the Parameters section for detailed information.
4.1 Student Data Commands:
4.1.1 Adding a student: addStu
Adds a student to the TrackMate application.
Format: addStu n/NAME s/STUDENT_ID [c/TUTORIAL_ID]
Tip: You can add a student without specifying a tutorial ID!
Command Detail & Constraints:
- This command registers a new student in the system with essential details like name and student ID, and optionally assigns them to a tutorial.
- The field format:
[c/TUTORIAL_ID]is optional to add. If not provided, the student will not be assigned to any tutorial upon addition. - Each student must have a unique student ID within the system.
- Duplicate names with different student ID are allowed.
Notes:
- Execute
addStucommand afterfindcommand will return the full list of students in TrackMate application.- Since this application is catered to only one module, each student can only be assigned to one tutorial.
Examples:
addStu n/Samson s/A1234567X c/T1001: Adds a student named "Samson" with the student ID "A1234567X" and assigns him/her to tutorial ID "T1001".Expected output: New student added: Samson; Student ID: A1234567X; Tutorial Class: T1001
addStu n/Alice s/A1234567C: Adds a student named "Alice" with the student ID "A1234567C" without assigning a tutorial class.Expected output: New student added: Alice; Student ID: A1234567C; Tutorial Class: No tutorial assigned
4.1.2 Edit existing student detail: edit
Edits the existing student details in the TrackMate application.
Format: edit INDEX [n/NAME] [s/STUDENT_ID] [c/TUTORIAL_ID]
Command Detail & Constraints:
- This command allows you to specify new values for a student's name, student ID, and/or tutorial ID, ensuring that each student's information is up to date and accurately reflects any changes in their academic or tutorial assignments.
- Edits the student at the specified
INDEX. The index refers to the index number shown in the displayed student list. The index must be a positive integer 1, 2, 3, … - At least one of the optional fields must be provided.
- Existing values will be updated to the input values.
- User must only edit a student's tutorial ID to the tutorial ID of an existing tutorial class.
Note:
- Execute
editcommand afterfindcommand will edit the student data based on the filtered list afterfindcommand
Examples:
edit 1 n/Samson Chew s/A1234567M: Edits the name and student ID of the 1st student to be "Samson Chew" and "A1234567M" respectively.edit 2 c/T1002: Edits the tutorial ID of the 2nd student to be "T1002".
4.1.3 Delete a student: deleteStu
Delete a specified student from the TrackMate application.
Format: deleteStu INDEX
Command Details & Constraints:
- Deletes the student at the specified
INDEX. - The
INDEXmust not exceed the number of student in the displayed list. - No prefix is required for
deleteStucommand. - The command should only consist of exactly two words:
deleteStuand a validINDEX. - All parameters are required to adhere to their respective constraints.
Note:
- Execute
deleteStucommand afterfindcommand will delete the student data based on the filtered list afterfindcommand
Example:
deleteStu 1deletes the first person in the list displayed.
4.1.4 Find students: find
Finds persons whose names contain any of the given keywords.
Format: find KEYWORD [KEYWORD]...
Command Details & Constraints:
- The search is case-insensitive. e.g hans will match Hans
- The order of the keywords does not matter. e.g. Hans Bo will match Bo Hans
- Only the name is searched.
- Only full words will be matched e.g. Han will not match Hans
- Persons matching at least one keyword will be returned (i.e. OR search). e.g. Hans Bo will return Hans Gruber, Bo Yang
Example:
find Johnreturns john and John Doefind alex davidreturns Alex Yeoh, David Li
4.1.5 Listing students: list
Shows a list of all students in the TrackMate application.
Format: list
Command Details & Constraints:
- The command does not require any additional parameters; entered parameters will be disregarded.
4.2 Tutorial Data Related Commands:
4.2.1 Adding a tutorial: addTut
Adds a tutorial with a specified tutorial name and tutorial id to the TrackMate application.
Format: addTut tn/[TUTORIAL NAME] c/[TUTORIAL ID]
Tip: For tutorials that you have trouble in naming, use the module name as the tutorial name. (ie. CS2103T)
Command Details & Constraints:
- Adds the tutorial based on its
TUTORIAL_NAMEandTUTORIAL_ID - The
TUTORIAL_IDshould be alphanumeric with the following formatTXXXXwhereTsignifies that it is a tutorial code andXmust be an integer between 0 and 9. - There cannot be tutorial classes of the same
TUTORIAL_IDin the list even when theirTUTORIAL_NAMEis different. - All parameters are required to adhere to their respective constraints.
Example:
addTut tn/CS2103T c/T1001adds a tutorial with Tutorial NameCS2103Tand Tutorial IDT1001, provided that there is no other tutorial with the Tutorial IDT1001.
Note: We can have tutorials with different tutorial names and the same tutorial id to support better flexibility over classes. For example, there can be 2 tutorial classes with
TUTORIAL_NAMECS2103T-W08, but can have 2 different tutorial ids to account for the 2 different groups.
4.2.2 Delete a tutorial: deleteTut
Delete a specified tutorial from the TrackMate application.
Format: deleteTut c/TUTORIAL_ID
Command Details & Constraints:
- Deletes the tutorial based on the
TUTORIAL_ID- The
TUTORIAL_IDmust exist in the tutorial list.
- The
- Prefix is required for
deleteTutcommand. - All parameters are required to adhere to their respective constraints.
Example:
deleteTut c/T1001deletes the tutorial with Tutorial IDT1001, provided the tutorial exists.
4.2.3 List tutorials: listTut
List all the tutorials that are currently stored in the application
Format: listTut
Command Details & Constraints:
- This command will display all tutorials with details such as:
- tutorial name
- tutorial id
- The command does not require any additional parameters; entered parameters will be disregarded.
4.3 Assignment Data Related Commands:
4.3.1 Adding an assignment: addAsg
Add a new assignment with the given title and due date to the TrackMate application.
Format: addAsg n/ASSIGNMENT_TITLE d/yyyy-MM-dd HHmm
Command Details & Constraints:
- Create a new assignment with title ASSIGNMENT_TITLE and the specified due date.
- Due date is in the format yyyy-MM-dd HHmm.
- Duplicate assignment titles are not allowed.
- Assignment titles are case-sensitive, where
Assignment 1is different fromassignment 1. - e.g.: Command
addAsg n/Assignment 1 d/2024-05-05 1200andaddAsg n/assignment 1 d/2024-05-05 1200are allowed one after another.
- Assignment titles are case-sensitive, where
- The due date must be in the format
yyyy-MM-dd HHmmand represent a valid date and time.- Due date is valid if it corresponds to an actual date and time.
2024-02-30 1200is invalid as 30th February does not exist.2024-02-29 1200is valid as 29th February 2024 exists.2024-02-02 2401and2024-02-02 2400are both invalid timings.
- A due date that has already passed is allowed, as tutors may need to add past assignments for record-keeping purposes.
- Due date is valid if it corresponds to an actual date and time.
Example:
addAsg n/CS2103T Assignment 2 d/2024-10-25 2359addAsg n/CS2101 CA1 d/2024-09-23 1200
4.3.2 Delete an assignment: deleteAsg
Delete a specified assignment from the TrackMate application.
Format: deleteAsg n/ASSIGNMENT_TITLE
Command Details & Constraints:
- Deletes the assignment based on the
ASSIGNMENT_TITLE- The
ASSIGNMENT_TITLEmust exist in the assignment list. ASSIGNMENT_TITLEmust not be empty.
- The
- Prefix is required for
deleteAsgcommand. - All parameters are required to adhere to their respective constraints.
Example:
deleteAsg n/CS2101 CA3deletes the assignment with assignment nameCS2101 CA3, provided the assignment exists.
4.3.3 List assignments: listAsg
List all assignments tracked in the TrackMate application.
Format: listAsg
Command Details & Constraints:
- This command will display all assignments with details such as:
- title
- due date
- number of students who have completed the assignment
- The command does not require any additional parameters; entered parameters will be disregarded.
Tip: For sections 4.3.4 and 4.3.5, before using the
markandunmarkcommands, users should first run thelistAsgcommand to view assignment names.
4.3.4 Mark an assignment: markAsg
Mark the status of the given assignment for the student at specified index as completed.
Format: markAsg INDEX n/ASSIGNMENT_TITLE
Command Details & Constraints:
- Using the given index of the student, TrackMate will mark his/her assignment status as completed.
- Assignment with the given non-empty title must exist.
- Student at the specified index must exist.
- Regardless of the previous assignment status, this command will show successful message for the ease of usage.
Example:
markAsg 1 n/CS2103T Assignment 2markAsg 12 n/CS2101 CA1
4.3.5 Unmark an assignment: unmarkAsg
Mark the status of the given assignment for the student at specified index as not completed.
Format: unmarkAsg INDEX n/ASSIGNMENT_TITLE
Command Details & Constraints:
- This command is the opposite of mark command.
- Using the given index of the student, TrackMate will mark his/her assignment status as not completed.
- Assignment with the given non-empty title must exist.
- Student at the specified index must exist.
- Regardless of the previous assignment status, this command will show successful message for the ease of usage.
Example:
unmarkAsg 1 n/CS2103T Assignment 2unmarkAsg 10 n/CS2101 CA1
4.3.6 Check an assignment: checkAsg
Check the completion statistics of the specified assignment.
Format: checkAsg n/ASSIGNMENT_TITLE
Command Details & Constraints:
- This command will display the statistics for the given assignment. This includes:
- Number of students who have completed the assignment.
- List of students who have completed the assignment.
- List of students who have not completed the assignment.
- Assignment with the given non-empty title must exist.
Example:
checkAsg n/CS2103T Assignment 2checkAsg n/CS2101 CA1
4.4 Attendance Data Related Commands:
4.4.1 Marking an attendance: markAtt
Mark student attendance within the tutorial class.
Format: markAtt s/STUDENT_ID c/TUTORIAL ID [d/ATTENDANCE_DATE]
Command Details & Constraints:
- Mark the student attendance based on student ID and tutorial ID
- The tutorial ID given must exist in the tutorial list.
- Date is optional (default date is today)
- Marking a student's attendance for the same date repeatedly is allowed.
Example:
markAtt s/A1234567X c/T1001 d/2024-02-21marks the attendance of student with student ID A1234567X in tutorial class T1001 on 2024/02/21.markAtt s/A1234567X c/T1001marks the attendance of student with student ID A1234567X in tutorial class T1001 on today's date.
4.4.2 Unmarking an attendance: deleteAtt
Delete student attendance within the tutorial class.
Format: deleteAtt s/STUDENT_ID c/TUTORIAL ID [d/ATTENDANCE_DATE]
Command Details & Constraints:
- Delete the student attendance based on student ID and tutorial ID
- The tutorial ID given must exist in the tutorial list.
- Date is optional (default date is today)
Example:
deleteAtt s/A01234567X c/T1001 d/2024-02-21deletes the attendance of student with student ID A01234567X in tutorial class T1001 on 2024/02/21.deleteAtt s/A01234567X c/T1001deletes the attendance of student with student ID A01234567X in tutorial class T1001 on today's date.
4.5 General Commands:
4.5.1 Viewing a Student on the Student Card:
View a single student's details in a formatted and organized manner.
Method - Using GUI: Double-click on a specific Student Panel Card within the Student List Panel of the TrackMate User Interface.
Note: After editing student details, user needs to re-click the Student Panel Card on the right to refresh the student card on the left to show the updated student details.
4.5.2 Clearing all data: clear
Clears all data from TrackMate.
Format: clear
Command Details & Constraints:
- The command does not require any additional parameters; entered parameters will be disregarded.
4.5.3 Exiting the program: exit
Exits the TrackMate application.
Format: exit
Command Details & Constraints:
- The command does not require any additional parameters; entered parameters will be disregarded.
4.5.4 Viewing help: help
Shows a message explaining how to access the help page.
Format: help
Command Details & Constraints:
- The command does not require any additional parameters; entered parameters will be disregarded.
- The help message image provided offers clear instructions for users seeking assistance.
4.6 Saving the data
The data in the TrackMate application are saved in the hard disk automatically after any command that changes the data. There is no need to save manually.
4.7 Editing the data file
The TrackMate data are automatically saved as JSON files at the following locations:
[JAR file location]/data/addressbook.json[JAR file location]/data/tutorials.json[JAR file location]/data/assignments.json
Furthermore, certain edits can cause the application to behave in unexpected ways (e.g., if a value entered is outside the acceptable range). Therefore, edit the data file only if you are confident that you can update it correctly.
5. FAQ
Q: How do I transfer my data to another computer?
A: Install the app in the other computer and overwrite the empty data file it creates with the file that contains the data of your previous TrackMate home folder.
Q: Can this app be used to handle multiple modules?
A: While this app allows for flexibility in naming your tutorials, it should not be used to handle multiple modules.
6. Known issues
- When using multiple screens, if you move the application to a secondary screen, and later switch to using only the primary screen, the GUI will open off-screen. The remedy is to delete the
preferences.jsonfile created by the application before running the application again.
7. Glossary
| Term | Definition and or Explanation |
|---|---|
| NUS | National University of Singapore |
| TA | Teaching Assistant, a tutor who will conduct tutorials in National University of Singapore |
| SoC | School of Computing in National University of Singapore |
| Student ID | A particular format of ID followed in NUS, Starting with a letter A followed by 7 digits and ending with a capital letter e.g A0252195L |
| GUI | Graphical User Interface , all the part of the application which you can interact with your mouse |
| CLI | Command Line Interface , part of application which can only be used with commands from the Keyboard |
| JSON | JavaScript Object Notation, a standard file format for data interchange |
8. Command summary
| Action | Format, Examples |
|---|---|
| Add Student | addStu n/NAME s/STUDENT_ID [c/TUTORIAL_ID]e.g. addStu n/Samson s/A1234567X c/T1001 |
| Edit Student | edit INDEX [n/NAME] [s/STUDENT_ID] [c/TUTORIAL_ID]e.g. edit 1 n/Samson Chew s/A1234567M |
| Delete Student | deleteStu INDEXe.g. deleteStu 3 |
| Find Student | find KEYWORD [KEYWORD]...e.g. find Samson San Chian |
| List Students | list |
| Add Tutorial | addTut tn/TUTORIAL NAME c/TUTORIAL IDe.g. addTut tn/CS1010 c/T1011 |
| Delete Tutorial | deleteTut c/TUTORIAL IDe.g. deleteTut c/T1011 |
| List Tutorials | listTut |
| Add Assignment | addAsg n/ASSIGNMENT TITLE d/DUE DATEe.g. addAsg n/Assignment 1 d/2024-10-23 1230 |
| Delete Assignment | deleteAsg n/ASSIGNMENT TITLEe.g. deleteAsg n/Assignment 1 |
| List Assignments | listAsg |
| Mark Assignment | markAsg INDEX n/ASSIGNMENT TITLEe.g. markAsg 1 n/Assignment 1 |
| Unmark Assignment | unmarkAsg INDEX n/ASSIGNMENT TITLEe.g. unmarkAsg 1 n/Assignment 1 |
| Check Assignment | checkAsg n/ASSIGNMENT TITLEe.g. checkAsg n/Assignment 1 |
| Mark Attendance | markAtt s/STUDENT_ID c/TUTORIAL ID [d/ATTENDANCE_DATE]e.g. markAtt s/A1234567X c/T1001 d/2024-02-21 |
| Unmark Attendance | deleteAtt s/STUDENT_ID c/TUTORIAL ID [d/ATTENDANCE_DATE]e.g. deleteAtt s/A1234567X c/T1001 d/2024-02-21 |
| Clear | clear |
| Help | help |
| Exit | exit |