TrackMate Developer Guide
Acknowledgements
We follow the project design and documentation structure of AB3.
Setting up, getting started
Refer to the guide Setting up and getting started.
For MacOS and Linux users, use the command, java -jar \[CS2103T-W08-1\]\[TrackMate\].jar to execute the jar file during PE if necessary.
Design
Architecture
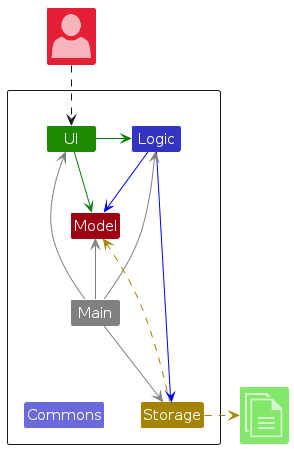
The Architecture Diagram given above explains the high-level design of the App.
Given below is a quick overview of main components and how they interact with each other.
Main components of the architecture
Main (consisting of classes Main and MainApp) is in charge of the app launch and shut down.
- At app launch, it initializes the other components in the correct sequence, and connects them up with each other.
- At shut down, it shuts down the other components and invokes cleanup methods where necessary.
The bulk of the app's work is done by the following four components:
UI: The UI of the App.Logic: The command executor.Model: Holds the data of the App in memory.Storage: Reads data from, and writes data to, the hard disk.
Commons represents a collection of classes used by multiple other components.
How the architecture components interact with each other
The Sequence Diagram below shows how the components interact with each other for the scenario where the user issues the command deleteStu 1.
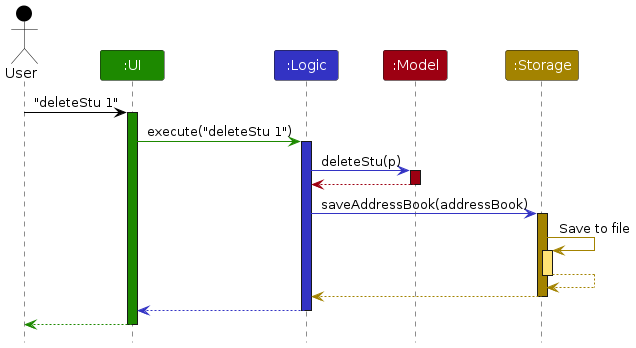
Each of the four main components (also shown in the diagram above),
- defines its API in an
interfacewith the same name as the Component. - implements its functionality using a concrete
{Component Name}Managerclass (which follows the corresponding APIinterfacementioned in the previous point.
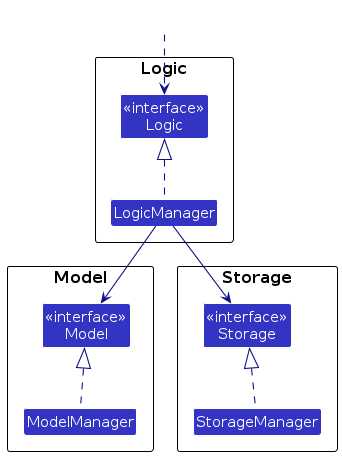
For example, the Logic component defines its API in the Logic.java interface and implements its functionality using the LogicManager.java class which follows the Logic interface. Other components interact with a given component through its interface rather than the concrete class (reason: to prevent outside component's being coupled to the implementation of a component), as illustrated in the (partial) class diagram below.
The sections below give more details of each component.
UI component
The API of this component is specified in Ui.java
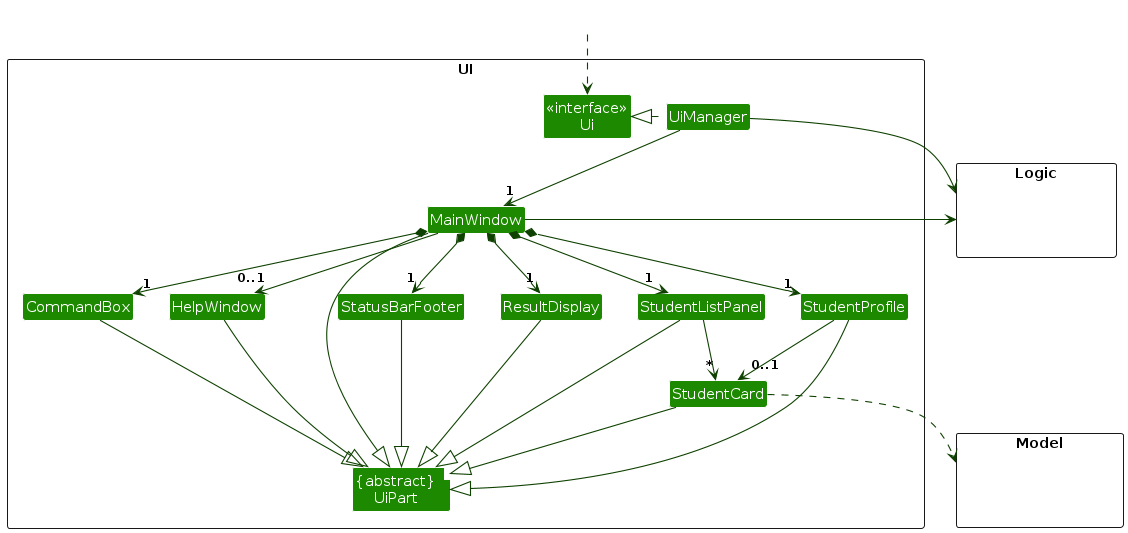
The UI consists of a MainWindow that is made up of parts e.g.CommandBox, ResultDisplay, StudentListPanel, StatusBarFooter etc. All these, including the MainWindow, inherit from the abstract UiPart class which captures the commonalities between classes that represent parts of the visible GUI.
The UI component uses the JavaFx UI framework. The layout of these UI parts are defined in matching .fxml files that are in the src/main/resources/view folder. For example, the layout of the MainWindow is specified in MainWindow.fxml
The UI component,
- executes user commands using the
Logiccomponent. - listens for changes to
Modeldata so that the UI can be updated with the modified data. - keeps a reference to the
Logiccomponent, because theUIrelies on theLogicto execute commands. - depends on some classes in the
Modelcomponent, as it displaysStudentobject residing in theModel.
Logic component
API : Logic.java
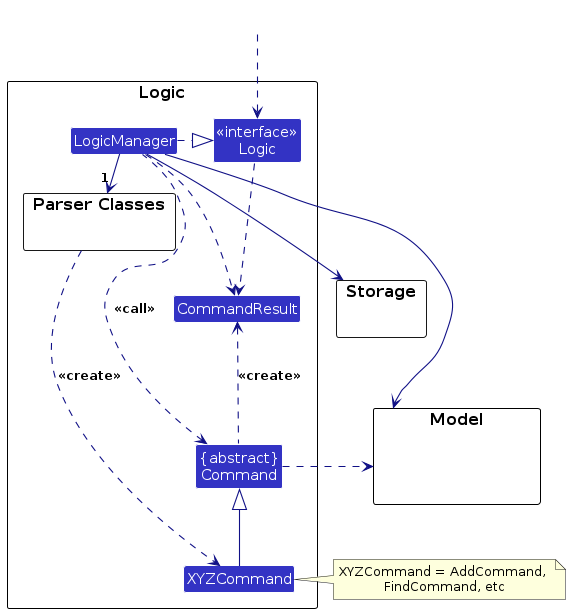
Here's a (partial) class diagram of the Logic component:
The sequence diagram below illustrates the interactions within the Logic component, taking execute("deleteStu 1") API call as an example.
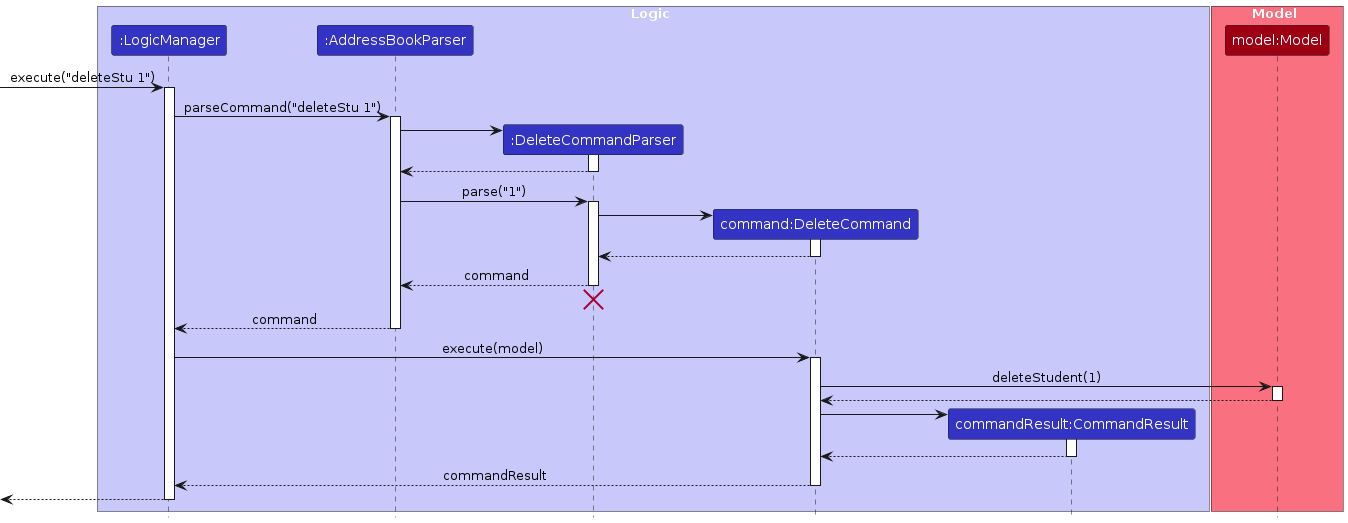
Note: The lifeline for DeleteCommandParser should end at the destroy marker (X) but due to a limitation of PlantUML, the lifeline continues till the end of diagram.
How the Logic component works:
- When
Logicis called upon to execute a command, it is passed to anAddressBookParserobject which in turn creates a parser that matches the command (e.g.,DeleteCommandParser) and uses it to parse the command. - This results in a
Commandobject (more precisely, an object of one of its subclasses e.g.,DeleteCommand) which is executed by theLogicManager. - The command can communicate with the
Modelwhen it is executed (e.g. to delete a student).
Note that although this is shown as a single step in the diagram above (for simplicity), in the code it can take several interactions (between the command object and theModel) to achieve. - The result of the command execution is encapsulated as a
CommandResultobject which is returned back fromLogic.
Here are the other classes in Logic (omitted from the class diagram above) that are used for parsing a user command:
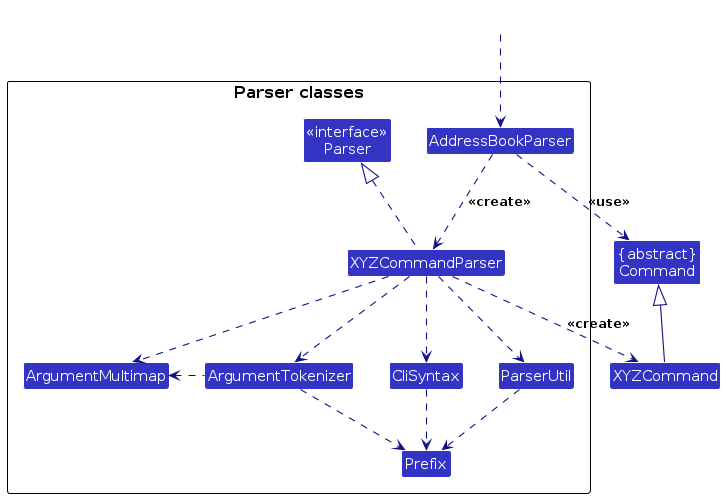
How the parsing works:
- When called upon to parse a user command, the
AddressBookParserclass creates anXYZCommandParser(XYZis a placeholder for the specific command name e.g.,AddCommandParser) which uses the other classes shown above to parse the user command and create aXYZCommandobject (e.g.,AddCommand) which theAddressBookParserreturns back as aCommandobject. - All
XYZCommandParserclasses (e.g.,AddCommandParser,DeleteCommandParser, ...) inherit from theParserinterface so that they can be treated similarly where possible e.g, during testing.
Model component
API : Model.java
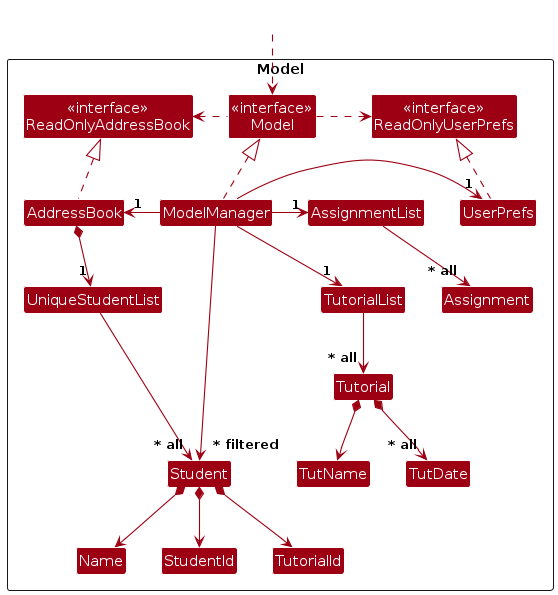
The Model component,
- stores the address book data i.e., all
Studentobjects (which are contained in aUniqueStudentListobject). - stores the currently 'selected'
Studentobjects (e.g., results of a search query) as a separate filtered list which is exposed to outsiders as an unmodifiableObservableList<Student>that can be 'observed' e.g. the UI can be bound to this list so that the UI automatically updates when the data in the list change. - stores a
UserPrefobject that represents the user’s preferences. This is exposed to the outside as aReadOnlyUserPrefobjects. - does not depend on any of the other three components (as the
Modelrepresents data entities of the domain, they should make sense on their own without depending on other components)
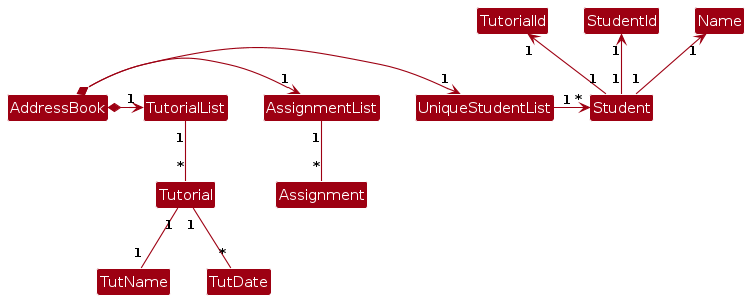
Note: An alternative (arguably, a more OOP) model is given below. This model introduces a more streamlined structure where AddressBook holds a TutorialList and an AssignmentList, linking directly to Tutorial and Assignment entities. Each Student is associated with a TutorialId, and Tutorial entities maintain a list of Student objects, making it easier to manage relationships and reducing redundancy. This design allows AddressBook to manage tutorials and assignments without requiring each student to hold separate Tutorial or Assignment objects, simplifying interactions and data management.
Storage component
API : Storage.java
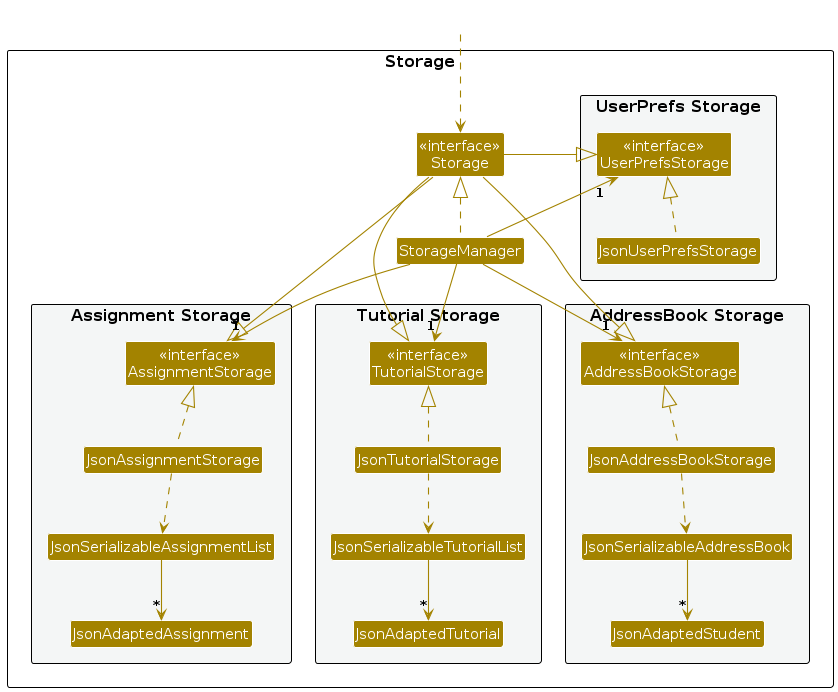
The Storage component,
- can save both address book data and user preference data in JSON format, and read them back into corresponding objects.
- can save both tutorial data and assignment data as well in JSON format, and read them back into corresponding objects.
- inherits from
AddressBookStorage,UserPrefStorage,TutorialStorageandAssignmentStorage, which means it can be treated as one of these (if only the functionality of only one is needed). - depends on some classes in the
Modelcomponent (because theStoragecomponent's job is to save/retrieve objects that belong to theModel)
Common classes
Classes used by multiple components are in the seedu.address.commons package.
Implementation
This section describes some noteworthy details on how certain features are implemented.
Please note that certain aspects, such as UML classes, may have been simplified to fit within the diagram's constraints and maintain readability.
Add feature
Users can seamlessly add tutorials, students and assignments into the TrackMate application. On top of that, users can also add student's tutorial attendance to maintain student's accurate attendance record.
Feature's Architecture Design
Centralized Parsing with AddCommandParser: The parsing logic is centralized in
AddCommandParserto ensure that input arguments are consistently handled across commands. This prevents each command from having redundant logic and promotes modularity by isolating parsing responsibilities.- Benefit: This structure simplifies the command classes, making them more focused on executing logic rather than parsing input.
- Challenge: It requires careful handling of the parsing rules to ensure correctness since the parser is a crucial layer between user input and the system’s execution.
Avoiding Duplicates with Tutorial and Student Validation: We ensure that duplicate students or non-existent tutorials are caught early in
ModelManager. This provides immediate feedback and prevents inconsistent states in the data model.- Benefit: Validation at the model level ensures the integrity of the data.
- Challenge: This requires checks across multiple classes (such as
TutorialListandStudent) to ensure consistency without impacting performance.
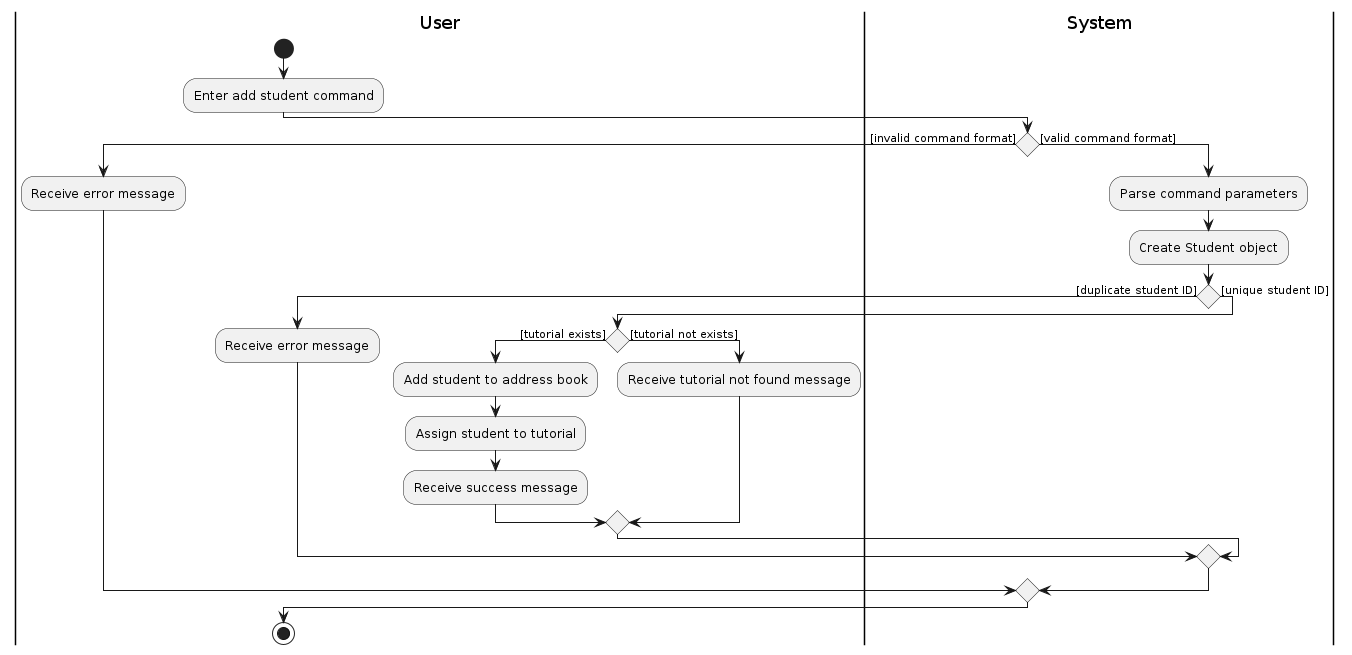
Add Student
To ensure data integrity and completeness, the system necessitates the inclusion of parameters such as Name and Student ID. The activity diagram below shows the sequence of action users will have to take to add a new Student Profile into the TrackMate Application.
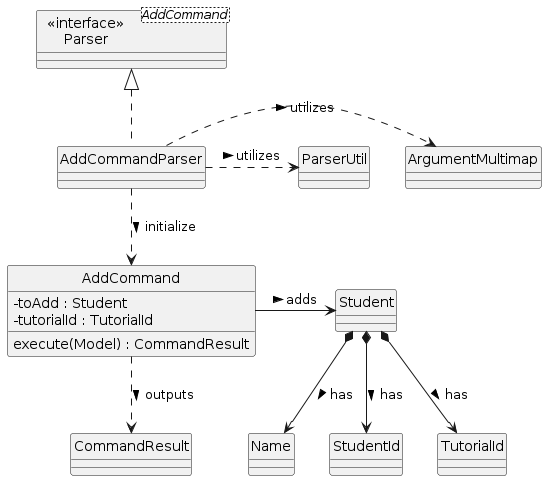
Besides, a class diagram of add student command is given below to demonstrate the interactions among classes.
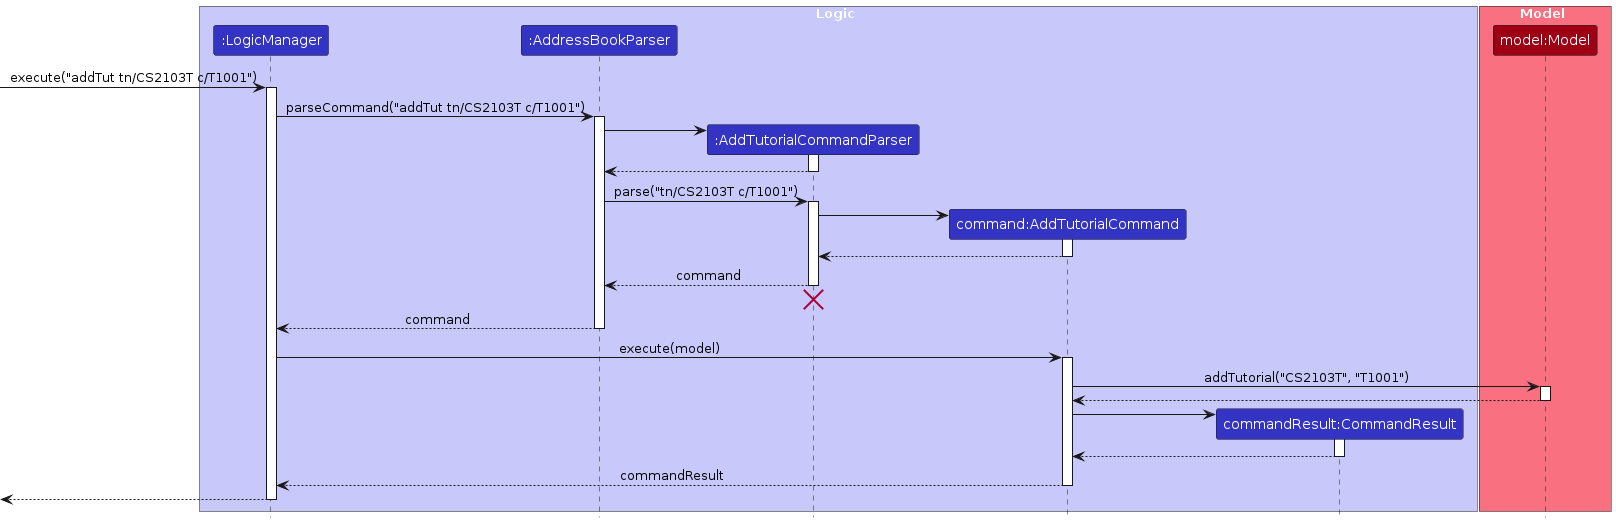
Add Tutorial
Similar to adding student, the system requires parameters such as Tutorial Name and Tutorial ID. The sequence diagram below demonstrates the interaction among various classes to add a new Tutorial into the TrackMate Application.
Add Attendance
The AttendCommand is responsible for marking the attendance of a student for a specific tutorial session in the TrackMate Application. This command interacts with the model to update the attendance record of a given student for a particular tutorial. The sequence diagram below shows how the command interact with other classes.

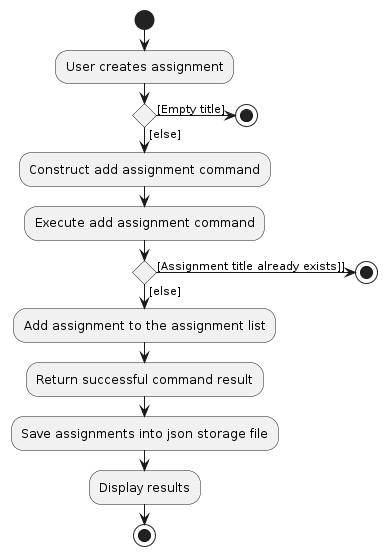
Add Assignment
Users can also add assignments to the TrackMate Application that are shared among all the students in every tutorial class. The activity diagram below will demonstrate what the users need to do to add assignment for students.
Implementation - Design Considerations:
Alternative 1 (Current Implementation):
Description: The current implementation uses a dedicated ParserUtil class to handle input parsing and data validation. This ensures that common validation logic (e.g., parsing names, student IDs, tutorial IDs or dates) is reusable across different components.
Pros:
- Code Modularity and Maintainability: By isolating validation logic from other components, we promote modularity, making updates and modifications easier.
- Consistency: Validation logic is standardized across different commands (e.g., AddCommand), ensuring that rules are applied uniformly.
- Ease of Testing: Having all parsing logic in one place makes it easier to unit test and debug issues related to input validation.
Cons:
- Additional Abstraction Layer: This approach introduces an extra layer between the raw input and command execution, which may increase the complexity of the system.
Alternative 2: Inline Validation in Domain Classes
Description: An alternative design is to incorporate validation logic directly within each relevant class (e.g., Student, TutorialId, Name) to enforce constraints close to where the data is used.
Pros:
- Context-Specific Validation: Each class can enforce rules that are specific to its context, ensuring validation aligns with the class's intended behavior.
- Simplifies Parsing Layer: Reduces the complexity of the parser classes, making them more lightweight.
Cons:
- Code Duplication: If similar validation logic (like checking valid names or student IDs) is required across multiple classes, this can lead to code duplication and inconsistency.
- Higher Maintenance Overhead: Changes to validation rules would need to be reflected across multiple classes, increasing the risk of inconsistent logic.
We chose Alternative 1 due to the modularity, maintainability, and consistency it provides. By centralizing the validation logic in ParserUtil, we ensure it aligns with the modular nature of our design, where commands and models interact through a well-defined interface. It also simplifies the commands by offloading validation and parsing responsibilities, promoting cleaner, more maintainable code.
Edit feature
The TrackMate application empowers users to update the details of existing students easily. With the Edit feature, users can modify a student's name, student ID, or assigned tutorial ID. This functionality ensures that student records remain accurate and up-to-date within the application, reflecting any changes in student information or tutorial assignments.
Feature's Architecture Design
Use of EditStudentDescriptor: The EditStudentDescriptor is a static inner class within EditCommand that stores the details of the fields to edit. It allows for optional fields, meaning users can choose to update any combination of the student's attributes without affecting others.
Benefit: This descriptor pattern provides a clean and flexible way to handle optional edits. It encapsulates changes, making it straightforward to create a new Student object with updated values. It also promotes code reuse and maintainability by isolating the edit details from the command execution logic.
Challenge: Managing optional values and ensuring that the descriptor accurately represents the intended changes without introducing errors requires careful implementation. Ensuring that at least one field is edited and providing appropriate error messages when none are requires precise checks.
Validation Checks in EditCommand: Before applying edits, several validation checks are performed such that we can ensure that the edited student does not duplicate an existing student in the address book unless it's the same student. Besides, it also validates that the new student ID, if changed, does not already exist in the system.
Benefit: These checks maintain data integrity, preventing inconsistent states and ensuring the uniqueness of critical identifiers like student IDs.
Challenge: These validations must be efficient to avoid performance degradation. They also need to be comprehensive to prevent any edge cases where data integrity could be compromised.
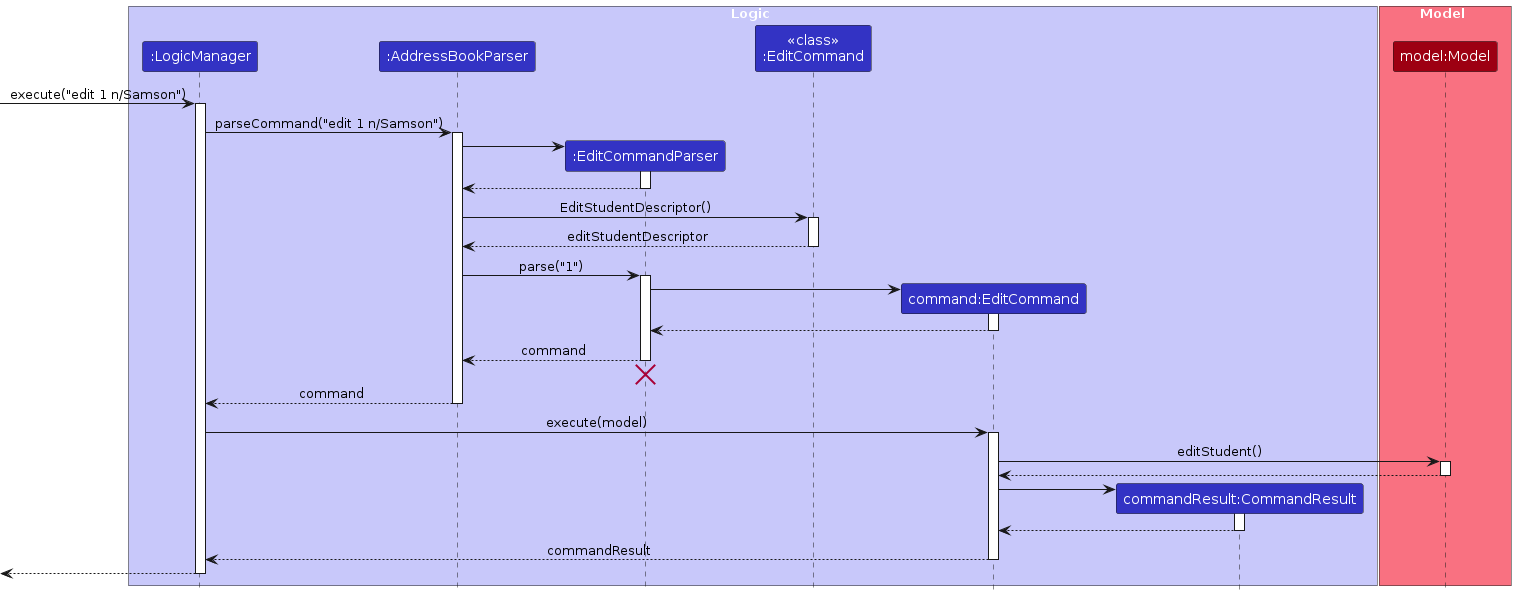
Edit Student
To maintain accurate and up-to-date student records, the Edit feature allows users to modify existing student information. The sequence diagram below shows how it involves specifying the student's index in the displayed list and providing any new values for the student's attributes.
Implementation - Design Considerations
Alternative 1 (Current Implementation):
Description:
The current implementation employs an EditStudentDescriptor to encapsulate the fields to be edited. The EditCommandParser handles the parsing of user input, populating this descriptor with provided values. The EditCommand then uses this descriptor to create a new Student object with the updated values, replacing the old one in the model.
Pros:
- Modularity: Separates parsing, validation, and execution logic, enhancing code maintainability.
- Flexibility: Handles optional fields gracefully, allowing users to edit any combination of a student's attributes.
- Immutability: Maintains the immutability of Student objects by creating new instances rather than modifying existing ones.
- Reusability: The EditStudentDescriptor can be reused for other commands requiring similar functionality.
Cons:
- Complexity: Introduces additional classes and layers of abstraction, which can increase the learning curve for new developers.
Alternative 2: Inline Editing with Mutable Student Objects
Description:
An alternative design could involve making the Student class mutable, allowing direct modification of its fields. The EditCommand would modify the fields of the existing Student object directly without creating a new instance.
Pros:
- Simplicity: Reduces the number of classes and abstractions, potentially making the codebase easier to understand.
- Performance: May be more efficient as it avoids creating new objects.
Cons:
- Data Integrity Risks: Mutable objects can lead to unintended side effects, making the system more prone to bugs.
- Loss of Immutability Benefits: Immutable objects are easier to reason about, especially in concurrent contexts.
- Inconsistency with Design Patterns: Deviates from the application's existing design principles, potentially causing confusion.
Decision:
We chose Alternative 1 due to its alignment with the application's overall design philosophy of using immutable data objects. This approach promotes safer code by avoiding side effects, making it easier to maintain and less error-prone. Although it introduces additional classes, the benefits of modularity, maintainability, and data integrity outweigh the added complexity. It also adheres to the Single Responsibility Principle, keeping parsing, data encapsulation, and execution concerns separate.
Delete Feature
The TrackMate application allows users to remove students, tutorials, assignments, and attendance records efficiently. The Delete feature ensures that outdated or incorrect records can be cleaned up, maintaining the integrity and relevance of the data within the application.
Feature's Architecture Design
- Centralized Parsing with DeleteCommandParser: The parsing logic for delete commands is centralized in their respective parser classes (e.g., DeleteCommandParser, DeleteTutorialCommandParser, etc.). Each parser is responsible for interpreting the user's input, extracting necessary identifiers (like student index, tutorial ID, assignment title), and creating the appropriate delete command object.
- Benefit: Centralizing parsing logic in dedicated parser classes promotes modularity and reusability. It ensures consistent input handling and reduces redundancy across different delete commands.
- Challenge: Each parser must handle specific validation rules and error messages, requiring careful implementation to provide meaningful feedback to the user.
- Model Updates and Data Consistency: The model (ModelManager) handles the actual deletion of entities:
Students: Deleting a student removes them from the address book, unassigns them from tutorials, and updates assignments and attendance records.
Tutorials: Deleting a tutorial removes it from the tutorial list and unassigns all associated students.
Assignments: Deleting an assignment removes it from the assignment list.
Attendance Records: Deleting attendance marks the student as absent for that date and tutorial.
- Benefit: Centralizing deletion logic in the model ensures consistent updates across the application and maintains data integrity.
- Challenge: Ensuring that all related entities are correctly updated without introducing bugs requires thorough testing and careful implementation.
Delete Student
To remove a student from the application, the user specifies the student's index in the displayed student list. The system ensures that the index is valid and then proceeds to delete the student, updating all related records. Below is the sequence diagram regarding deleting student.
Delete Tutorial
To delete a tutorial, the user provides the tutorial ID. The system verifies the existence of the tutorial and then removes it, updating any students assigned to it. The sequence diagram of deleting tuorial is similar to deleting student.
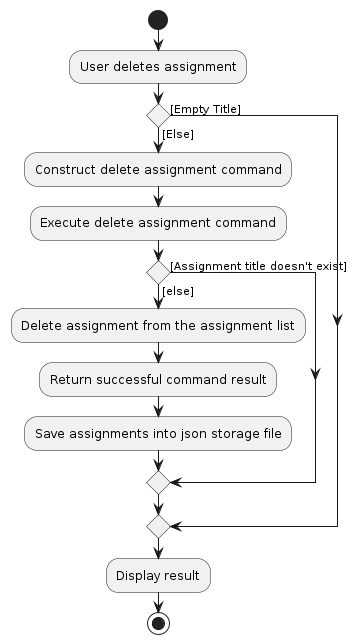
Delete Assignment
To delete an assignment, the user specifies the assignment title. The system ensures that the assignment exists before deleting it from the model. The activity diagram below illustrates what the series of actions the user should do to delete assignment.
Delete Attendance
To delete a student's attendance record for a specific date and tutorial, the user provides the student ID, tutorial ID, and date. The diagram is also similar to adding attendance, thus is not given.
Implementation - Design Considerations:
Alternative 1 (Current Implementation):
Description:
The current implementation utilizes specific delete commands for different entities (DeleteCommand for students, DeleteTutorialCommand for tutorials, etc.). Each command class handles the deletion logic pertinent to its entity type. Parsing and validation are handled in dedicated parser classes, and the model updates are performed through methods in ModelManager.
Pros:
- Modularity: Separation of concerns is maintained, with each command and parser responsible for a specific entity.
- Clarity: Code is organized, making it easier to understand and maintain.
- Reusability: Common validation and parsing logic can be reused across different delete commands.
Cons:
- Code Duplication: Similar validation logic may exist across different delete commands and parsers.
- Scalability: Adding new delete commands for additional entities requires creating new command and parser classes.
Alternative 2: Unified Delete Command with Type Specification
Description:
An alternative design is to implement a single DeleteCommand that can handle deletion of different entity types based on additional arguments specifying the type (e.g., student, tutorial, assignment).
Pros:
- Reduced Class Count: Fewer command and parser classes simplify the codebase.
- Single Entry Point: Easier for users to remember a single delete command.
Cons:
- Complex Parsing Logic: The parser must handle multiple entity types and validation rules, increasing complexity.
- Reduced Clarity: Mixing deletion logic for different entities in one command can make the code harder to maintain.
- Error-Prone: Higher risk of bugs due to the increased complexity in parsing and execution logic.
Decision:
We chose Alternative 1 because it promotes modularity, clarity, and maintainability. By having separate commands and parsers for each entity type, we can encapsulate the specific logic and validation required for each. This separation makes the codebase more organized and easier to extend or modify. Although there is some code duplication, the benefits of clarity and reduced complexity outweigh the drawbacks.
Future Enhancements
Team size: 5 people
In the current implementation of the attendance marking feature, the system does not validate the dates entered by users. This allows users to mark attendance for tutorial dates that have not yet occurred. In future updates, the system will include a date validity check to ensure attendance can only be marked for past or current dates.
If you try to enter a name that contains
/the application will show error message about invalid format forNAMEbut someone can have/in their legal name e.gPrabhat S/O Radhe, this limitation arises due to usage of/character for Internal use within the application. We plan to implement a stronger parser function in the future version to tackle with this legal name restriction on the character of/.In the current UI implementation, when some fields get too long where they exceed the width of the panel/window, some expected behaviors occur. For example,
Name:is replaced by...and the text is not wrapped properly. We plan to solve this issue by adding a sliding window in the future.For some commands, duplicated tags are not handled properly. For example, deleteTut and assignment-related commands have unexpected behavior when multiple tags are specified. Example command:
addAsg n/Assignment 1 d/2024-01-01 2359 d/2024-02-04 1200ignores the first deadline tag and creates an assignment with deadline2024-02-04 1200only instead of alerting the user that multiple prefixes are provided. This behavior applies to other tags and some other commands as stated above. We are planning to solve all of these unexpected behaviors in future versions by adding a layer of checking of prefixes.After editing student details in the student panel card on the right, the student card on the left will not display instantly. Users will need to re-click the student panel card to refresh the student card. In future implementations, we plan to make the student card instantly responsive to enhance user experience.
Assignment title, student ID and tutorial ID are currently case-sensitive as we have the format for the user to follow. Assignment title, student ID and tutorial ID will be implemented as case-insensitive in the future version to enhance the flexibility of the application command.
Currently, examples of tutorial names given in our application are misleading as we use different module codes even though it is only catered to one module. We plan to use clearer examples for tutorial names in the future by fixing it to the context of one module (e.g. CS2103T).
The error output of certain commands when a compulsory field missing in current implementation is not specific enough. For example, the error output for
addStu s/A1234567Xwill be better to be ‘name field is missing’. However, the current UI implementation will display the error message: “Invalid command format”, which may not be specific enough. This example applies to other commands that require a compulsory field or fields.Currently, the UI does not show the list of tutorials and assignments permanently. This causes some inconvenience to the users, as they have to constantly list assignments and tutorials. Hence, we plan to add the tutorial and assignment list display in future versions for the ease of usage.
In the current implementation, certain commands could be enhanced to provide more specific feedback for empty lists and invalid inputs. For instance, when executing list commands for students, assignments, or tutorials (list, listAsg, listTut), a generic success message appears even if the respective list is empty, which could be more informative. Displaying a message such as "No students/assignments/tutorials in the list" would provide clearer feedback for users. Additionally, mark attendance and delete attendance commands currently give a general error message ("Date should be valid and in correct format (yyyy-MM-dd)!") when an invalid date is entered (e.g., "2024-02-32"). Enhancing this feedback to distinguish between invalid formats and dates would improve user experience by clearly indicating whether the error is due to format issues or an invalid date.
Documentation, logging, testing, configuration, dev-ops
Appendix: Requirements
Product scope
Target user profile:
- NUS SOC tutors who want to track their student's progress
Value proposition: manage students' tasks and attendance faster than a typical mouse/GUI driven app
User stories
Priorities: High (must have) - * * *, Medium (nice to have) - * *, Low (unlikely to have) - *
| Priority | As a … | I want to … | So that I can… |
|---|---|---|---|
* * * | tutor | add student data | add student information efficiently |
* * * | tutor | delete student data | delete student information efficiently |
* * * | tutor | record student attendance daily through a CLI command | track student participation |
* * * | tutor | create assignments for students | assign tasks to students |
* * | tutor | edit student data | manage student information efficiently |
* * | tutor | list all students | see all students enrolled in the course |
* * | tutor | add tutorials | organize students into specific sessions or groups |
* * | tutor | list all tutorials | review all tutorial sessions currently available |
* * | tutor | delete a tutorial | manage tutorials efficiently by removing sessions that are no longer needed |
* * | tutor | add assignments | add assignment information efficiently |
* * | tutor | delete assignments | manage assignments efficiently by removing tasks that are no longer relevant |
* * | tutor | list all assignments | see all assignments I have created for the students |
* * | tutor | mark assignments as completed or pending | track the progress of each student |
* * | tutor | unmark assignments as completed | correct any mistakes in assignment status updates |
* * | tutor | check assignment status for a student | monitor individual student progress on given assignments |
* * | tutor | mark student attendance | keep track of each student's participation in the tutorials |
* * | tutor | unmark student attendance | correct mistakes in attendance marking |
* * | cross-platform user | run the application on any platform (Windows, Linux, OS X) without any OS-specific dependencies | use it anywhere |
* * | convenience-seeking educator | use the application without an installer | use it directly from the downloaded JAR file |
* | self-learning user | use interactive help commands | understand how to use the application without referring to external documentation |
Use cases
(For all use cases below, the System is the TrackMate and the Actor is the National University of Singapore teaching assistants, unless specified otherwise)
Use Case: Add Student
Main Success Scenario (MSS)
- User requests to add a new student.
- User inputs the required details.
- TrackMate confirms that the student details are valid and adds the student to the list.
- The new student record is successfully created.
Use case ends.
Extensions
2a. User enters incomplete or invalid student details:
- 2a1. TrackMate informs the user of the specific constraints for each field.
- 2a2. User re-enters the correct information. Steps 3a1–3a2 are repeated until all required fields are valid.
Use case resumes at Step 3.
2b. Duplicate student id found:
- 2b1. TrackMate informs the user that a student with the same id already exists.
- 2b2. User re-enters the new student id. Steps 3b1–3b2 are repeated until a new student id is provided.
Use case resumes at Step 3.
Use Case: Add Tutorial
Main Success Scenario (MSS)
- User requests to add a tutorial.
- User inputs the tutorial information.
- TrackMate validates the input and confirms the addition.
- The new tutorial session is successfully created.
Use case ends.
Extensions
2a. Invalid tutorial id or name format entered:
- 2a1. TrackMate informs the user of the constraints for tutorial id or name.
- 2a2. User re-enters the correct tutorial id or name. Steps 3a1–3a2 are repeated until a valid code is provided.
Use case resumes at Step 3.
2b. Duplicate tutorial id found:
- 2b1. TrackMate informs the user that a tutorial with the same id already exists.
- 2b2. User re-enters the new tutorial id. Steps 3b1–3b2 are repeated until a new tutorial id is provided.
Use case resumes at Step 3.
Use Case: Add Attendance
Main Success Scenario (MSS)
- User requests to record attendance for a tutorial session.
- User inputs the student information.
- TrackMate validates the input and confirms the attendance.
- Attendance data is successfully saved.
Use case ends.
Extensions
2a. User enters an invalid attendance date (correct date format: yyyy-MM-dd)
- 2a1. TrackMate informs the user of the accepted date format for attendance.
- 2a2. User re-enters the date. Steps 2a1–2a2 are repeated until a valid status is given.
Use case resumes at Step 3.
2b. User enters the student information wrongly.
- 2b1. TrackMate informs the user that the student information is incorrect.
- 2b2. User re-enters the student information. Steps 2a1–2a2 are repeated until a valid status is given.
Use case resumes at Step 3.
Use Case: Add Assignment
Main Success Scenario (MSS)
- User requests to add a new assignment.
- User inputs the assignment information.
- TrackMate validates the assignment details.
Use case ends.
Extensions
2a. User enters an invalid due date (incorrect date format: yyyy-MM-dd)
- 2a1. TrackMate informs the user of the accepted date format for due date.
- 2a2. User re-enters the due date in the correct format. Steps 2a1–2a2 are repeated until a valid date is entered.
Use case resumes at Step 3.
2b. Duplicate assignment name found:
- 2b1. TrackMate informs the user that an assignment with the same name already exists.
- 2b2. User re-enters the new assignment name. Steps 2a1–2a2 are repeated until a new assignment name is entered.
Use case resumes at Step 3.
Use Case: Edit the Information of a Student
Main Success Scenario (MSS)
- User request to edit student details.
- User inputs the student index and updated information.
- The student's information is successfully changed.
Use case ends.
Extensions
2a. Invalid student index is entered
- 2a1. TrackMate informs user that the index is invalid.
- 2a2. User enters the correct student index and updated information. Steps 2a1 - 2a2 are repeated till a valid student index is given.
Use case resumes at step 3.
2b. detect error in any updated information entered (invalid format)
- 2b1. TrackMate informs the user of the specific constraints for each field.
- 2b2. User re-enters the correct information. Steps 3a1–3a2 are repeated until all required fields are valid.
Use case resumes at step 3.
2c. updated information is the same as current information
- 2c1. No changes made to information
Use case ends.
Use Case: Delete Student
Main Success Scenario (MSS)
- User request to delete student details.
- User inputs the student's index.
- TrackMate successfully deletes the student record.
Use case ends.
Extensions
2a. Invalid student index is entered
- 2a1. TrackMate informs user that the index is invalid.
- 2a2. User enters the correct student index and updated information. Steps 2a1 - 2a2 are repeated till a valid student index is given.
Use case resumes at step 3.
Non-Functional Requirements
- Should work on any mainstream OS as long as it has Java
17or above installed. - Should be able to hold up to 1000 students without a noticeable sluggishness in performance for typical usage.
- A user with above average typing speed for regular English text (i.e. not code, not system admin commands) should be able to accomplish most of the tasks faster using commands than using the mouse.
- The application should start up in under 3 seconds on a standard machine with Java 17 installed.
- Automated backups should be encrypted to secure data during storage and transfer.
- Customizable themes should include options for high contrast and font size adjustments for visual accessibility.
- The system is optimized for single-user operation and does not need to handle multi-user access.
- The application should be optimized for low CPU and memory usage to run smoothly on standard hardware.
- The application should be reliable enough for continuous use during working hours without the need for frequent restarts.
- The application size should be less than 50mb to facilitate easy distribution and storage.
Glossary
- AB-3: The code name for the AddressBook Level 3 application, which serves as the base framework for the student management system being developed.
- NUS SOC: National University of Singapore, School of Computing. The application is designed for tutors within this institution to manage student progress effectively.
- Tutor: The primary user of the application—an NUS School of Computing tutor responsible for tracking students' progress, attendance, and assignments.
- CLI (Command Line Interface): A text-based interface where users interact with the application by typing commands rather than using graphical elements like buttons.
- GUI (Graphical User Interface): A visual interface that allows users to interact with the application through graphical elements like windows, buttons, and menus.
- JSON (JavaScript Object Notation): A lightweight data format used for data storage and transmission, typically for configuration or file storage.
- Parser: A component that interprets user commands and converts them into actions or objects that the system can process.
- MSS (Main Success Scenario): The primary sequence of steps in a use case where everything proceeds as expected without any errors.
- JAR File: Java ARchive file; a package file format that bundles Java class files and associated metadata for distribution.
- Prerequisite: Compulsory requirements to fulfil before every manual testing action.
Appendix: Instructions for manual testing
Given below are instructions to test the app manually.
Note: These instructions only provide a starting point for testers to work on; testers are expected to do more exploratory testing.
Launch and shutdown
Initial launch
Prerequisite: Download the jar file and copy into an empty folder
Test case: Double-click the jar file
Expected: Shows the GUI with a set of sample contacts. The window size may not be optimum.
Saving window preferences
Prerequisite: Resize the window to an optimum size. Move the window to a different location. Close the window.
Test case: Re-launch the app by double-clicking the jar file.
Expected: The most recent window size and location is retained.
Adding a student
Tip: Replace "INVALID_ID" with "A12345678X" and "INVALID_TUT" with "T12345" for testing purpose here
Sample error message indicating that invalid command format: Invalid command format!
Sample error message indicating that the student ID format is invalid: Student ID should be in the format: 'A' followed by seven digits and an uppercase character.
Sample error message indicating that the tutorial ID format is invalid: Tutorial class should be in the format of Txxxx where xxxx are four digits.
Prerequisite: Ensure that the tutorial T1001 exists in the system.
Adding a student with all required details
- Test case:
addStu n/John Doe s/A1234567X c/T1001
Expected: A new student named "John Doe" with student ID "A1234567X" is added to tutorial "T1001". Confirmation message is displayed with the student's details.
- Test case:
Adding a student with missing compulsory fields
Test case:
addStu n/John Doe c/T1001
Expected: Error message indicating that invalid command format will output.Test case:
addStu s/A1234567X c/T1001
Expected: Error message indicating that invalid command format will output.
Adding a student with invalid data
Test case:
addStu n/John Doe s/INVALID_ID c/T1001
Expected: Error message indicating that the student ID format is invalid.Test case:
addStu n/John Doe s/A1234567X c/INVALID_TUT
Expected: Error message indicating that the tutorial ID format is invalid.Test case:
addStu n/John Doe s/INVALID_ID c/INVALID_TUT
Expected: Error message indicating that the student ID format is invalid. Invalid student ID format will be prioritised over invalid tutorial ID in this case.
Editing a student
Prerequisite 1: At least one student exists in the list. For example, a student at index 1.
Prerequisite 2: Ensure that the tutorial T2001 exists in the system.
Prerequisite 3: Ensure that no student with student ID "A7654321X" exists in the system.
Editing a student's details
- Test case:
edit 1 n/Jane Smith s/A7654321X c/T2001
Expected: Student at index 1 is updated with the new name "Jane Smith", student ID "A7654321X", and assigned to tutorial "T2001". Confirmation message is displayed with the updated details.
- Test case:
Editing a student with some fields missing
- Test case:
edit 1 n/Jane Smith
Expected: Only the name of the student at index 1 is updated to "Jane Smith". Other details remain unchanged.
- Test case:
Editing a student with invalid command format
- Test case:
edit 0 n/Jane Smith
Expected: Error message indicating that the command format is invalid.
- Test case:
Deleting a student
Prerequisite: List all students using the
listcommand. Multiple students in the list.
Deleting a student while all students are being shown
Test case:
deleteStu 1
Expected: First contact is deleted from the list. Details of the deleted contact shown in the status message. Timestamp in the status bar is updated.Test case:
deleteStu 0
Expected: No student is deleted. Error details shown in the status message. Status bar remains the same.
Other incorrect delete commands to try:
deleteStu,deleteStu x,...(where x is larger than the list size)
Expected: Similar to previous.Test case:
deleteStu 1
Expected: First contact is deleted from the list. Details of the deleted contact shown in the status message. Timestamp in the status bar is updated.Test case:
deleteStu 0
Expected: No student is deleted. Error details shown in the status message. Status bar remains the same.Other incorrect delete commands to try:
deleteStu,deleteStu x,...(where x is larger than the list size)
Expected: Similar to previous.
Marking attendance
Prerequisite: Student with ID "A1234567X" exists and is assigned to tutorial "T1001".
Marking a student's attendance for a tutorial session
- Test case:
markAtt s/A1234567X c/T1001 d/2023-10-21
Expected: Attendance for student "A1234567X" on "2023-10-21" is marked as present in tutorial "T1001". Confirmation message is displayed.
- Test case:
Marking attendance for a student not in the tutorial
- Test case:
markAtt s/A1234567X c/T2001 d/2023-10-21
Expected: Error message indicating that the student is not enrolled in tutorial "T2001".
- Test case:
Marking attendance with invalid date format
- Test case:
markAtt s/A1234567X c/T1001 d/21-10-2023
Expected: Error message indicating that the date format is invalid. Correct format should be "YYYY-MM-DD".
- Test case:
Marking/Unmarking assignment
Note: Users are expected to use the command listAsg to find out the assignment names before marking or unmarking. This is explained under tip for User Guide Section 4.3.3.
Marking/Unmarking a student's assignment status for a specific assignment.
Prerequisites: Student at specified index exists and assignment with specified name exists (case-sensitive).
Test case:
markAsg 1 n/Assignment 1where the student's assignment status is not marked before.
Expected: Assignment marked successfully!Test case:
markAsg 1 n/Assignment 1where the student's assignment status is marked before.
Expected: Assignment marked successfully!Test case:
unmarkAsg 1 n/Assignment 1where the student's assignment status is previously marked as completed.
Expected: Assignment unmarked successfully!Test case:
unmarkAsg 1 n/Assignment 1where the student's assignment status is previously incomplete.
Expected: Assignment unmarked successfully!Note: Repeated marking or unmarking actions on the same assignment (e.g., marking an already marked assignment) yield the same success message. This is because write after write operation does not affect the usage. Same message is displayed to avoid users' confusion.
Marking/Unmarking a student's assignment status with invalid/missing index.
- Test case:
markAsg 0 n/Assignment 1
Expected: The student index provided is invalid. - Test case:
unmarkAsg 1000 n/Assignment 1where student at index 1000 does not exist.
Expected: The student index provided is invalid. - Test case:
markAsg n/Assignment 1
Expected: Error message indicating that the provided command format is invalid.
- Test case:
Marking/Unmarking a student's assignment status with invalid/missing assignment name.
- Test case:
markAsg 1 n/lorem ipsumwhere assignment with name "lorem ipsum" does not exist.
Expected: There is no matching assignment with the given name! - Test case:
unmarkAsg 1 n/where assignment has empty name.
Expected: Assignment title cannot be empty!
- Test case:
Saving data
Dealing with missing data files
- Simulate a missing data file:
- Close the application.
- Navigate to the data directory where the application stores its data files.
- Delete the data file (e.g., addressbook.json).
- Re-launch the application.
Expected: The application starts with an empty data set. A new data file is created automatically.
- Simulate a missing data file:
Dealing with corrupted data files
- Simulate a corrupted data file:
- Close the application.
- Open the data file (e.g., addressbook.json) with a text editor.
- Introduce invalid JSON syntax (e.g., delete a closing brace or add random text).
- Save the file.
- Re-launch the application.
Expected: The application detects the corrupted data file and displays an error message in the terminal. It will then start with an empty data set.
- Simulate a corrupted data file: